Delete Patron Information
The Delete sub-tab of Update Patrons lets you delete patron information. You can use it to delete multiple patrons, notes, comments or recommendations.
To delete a single patron record, use the Manage Patrons Delete feature.
Delete Patron Information
This is useful when a large number of patrons are no longer associated with your library or school, or for cleaning up patron records at the end of the school year.
In Library Manager, you can also use this feature to delete patrons' MyQuest comments or recommendations.
- Select Admin > Update Patrons > Delete sub-tab.
- From the Delete drop-down, select the information to delete:
- Patrons
- Notes
- My Quest Comments (LM Only)
- Recommendations (LM Only)
- From the Based-on drop-down, select the information on which you want to base the deletions:
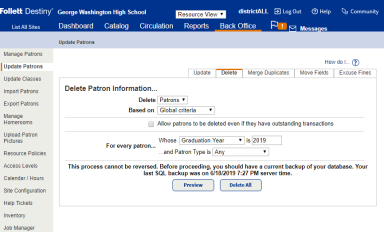
- Global Criteria
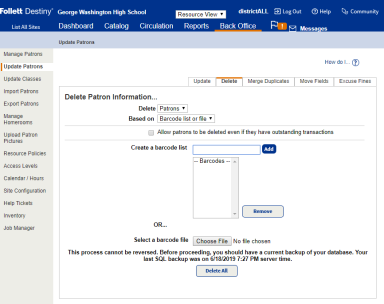
- Barcode list or file
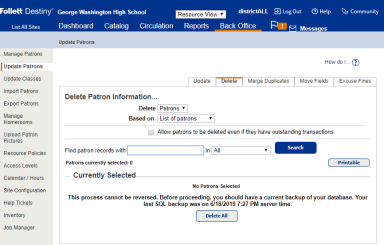
- List of Patrons
- (Optional) By default, patrons with outstanding transactions are preserved. You can select Allow patrons to be deleted even if they have outstanding transactions.
- Use this table to fill in the fields:
Global Criteria 
- From the Whose list, select the patron field on which you are basing the deletion.
- In the is field, select or enter the contents of the field that you want Destiny to find.
- (Optional) If the ...and Patron Type is appears, you can leave the default Any, or use the drop-down to limit deletion by type.
Barcode list or file 
Identify the patron records to delete.
- To select an existing file, click Browse.
- To create a list, use the Create a barcode list field scan the barcodes.
Note: To remove a barcode number from the list, select it and click Remove.
List of Patrons 
To identify the records to delete:
- In the Find patron records with field, enter a value.
In the drop-down next to in, select the field to search.Note: If you do not have the whole name or word, enter part of it, followed by *, or use a question mark (?) to replace a single letter. - Click Search.
- In the list that appears, find the correct patron and click Select. The patron moves to the Currently Selected section at the bottom of the page.
- Repeat these steps for each patron.
- (Optional) In some configurations, you can preview records before deleting them:.
- Click Preview.
- When the Job Manager opens, click View.
- If the deletions appear correct, click Delete All at the bottom of the summary to change the due dates.
- Once you have defined the changes and identified or selected the patrons, click Delete All to begin the update.
Job Summary
For each Delete job or preview, Destiny generates a Job Summary showing how many records were deleted or skipped and lists the records.
Previews include the ability to delete all, or edit a patron in the list.
Delete a Patron Record
- Select Admin > Manage Patrons.
- To search for the patron to be deleted, enter a name into the Find field.
- (Optional) To limit the search, select from the drop-down next to in, or select Only Active Patrons.
- (Optional) To search for patrons at other sites, select the Search across the district checkbox.
- Click Search.
- In the search results list, find the patron’s record.
- Click Delete.
- When the confirmation message appears, click Yes.