Manage Library Sublocations
Sublocation can be used to organize a library by subject or genre, also known as genrefication. A sublocation refers to an area in your library or building, such as a special shelving location, display cabinet or classroom. Destiny has 20 sublocations included by default, that can you add to or edit at the district or site level.
You can also update copies
Add or edit sublocations at the site level:
- Log in as Destiny administrator.
- Select Admin > Site Configuration > Site Administration.
- Next to Library Sublocations, click
 .
. - Do one of the following:
If you want to... Then... Add a new sublocation In the Add Sublocation field, type the name of the sublocation you want to create (up to 30 characters). Edit a sublocation Next to the sublocation you want to change, click . - Click Save.
Add or edit sublocation at the district level:
- Log in as a Destiny Administrator.
- Select Setup > District Options > Site Configuration Settings > Edit > Catalog.
- Next to Miscellaneous Settings, click.
- Next to Library Sublocations, click.
- Do one of the following:
If you want to... Then... Add a new sublocation In the Add Sublocation field, type the name of the sublocation you want to create (up to 30 characters). Edit a sublocation Next to the sublocation you want to change, click . - You can either Save the updates, or push the settings to a site(s). To push to a site, in the Apply these settings at drop-down, select a site or site types.
- Click Push. A warning message appears.
- If you want to proceed, click Yes.
Edit a sublocation in a copy
After you conduct a search for materials, you can go to the copy record and edit the existing sublocation in either Search Results or Title Details.
Modify bib import
When a MARC record file has a sublocation and is imported, that sublocation is created within the system.
When you import titles, Destiny lets you assign copy information, in addition to using the Other button to add, edit and delete sublocations.
Modify a copy's sublocation during import:
- Log in at the site or district level.
- Select Catalog > Import Titles.
- District level only: Under This import file contains..., click the Titles and copies for option, and select the appropriate import site from the drop-down.
Note: The site you select determines which sublocations are available.
- Next to Assign Copy Information, click Update.
- Next to Sublocation, select the desired sublocation from the drop-down. Or, click Other to do the following:
If you want to... Then... Add a sublocation Type a name in the Add Sublocation field, and click Save. Edit a sublocation In the row of the sublocation you want to edit, click . Delete a sublocation In the row of the sublocation you want to delete, click  . You have the option of changing copies currently assigned to this sublocation to a different sublocation. Click Yes to proceed.
- Click Save.
Individual update of sublocation
In Destiny, you can update a copy in a barcode list or a local copy attached to a title in a Resource List to the chosen sublocation value.
- Select Catalog > Update Copies > Individual Update.
- You can scan a barcode or enter it manually in the Copy from Library Materials field.
- In the - Select a copy field - drop-down, select Sublocation.
- In the corresponding drop-down, called -- Undefined -- by default, select the library sublocation you want to update.
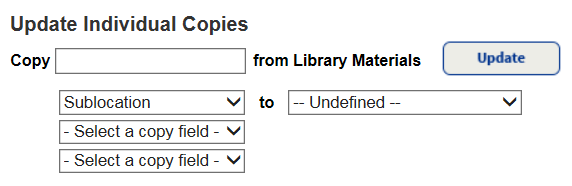
- Click Update.
- Click Refresh and then View.
In Destiny, you can update copies in a barcode list or local copies attached to titles in a Resource List to the chosen sublocation value.
- Go to Catalog > Update Copies > Batch Update.
If you... Then... Log in at the district level In the Site drop-down, select the site/site type that you want to update. Then go to step 2. Log in at the site level Go to step 2.
- In the - Select a copy field - drop-down, select Change Sublocation to.
- In the corresponding drop-down, Undefined by default, select the library sublocation you want to update.
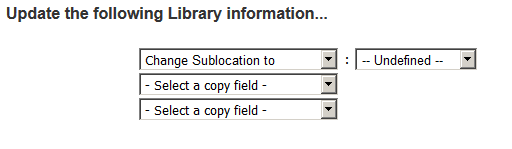
- In the Update all copies in drop-down, select where you want to update copies.
- Click Update.
- Click Refresh and then View.
Destiny lets you globally update one sublocation with another.
- Select Catalog > Update Copies > Global Update.
- In the With drop-down, select Sublocation, and then in the drop-down labeled -- Undefined -- select the sublocation you want to replace.
- In the Make drop-down, select Sublocation, and then select the sublocation you want to choose.
Note: When you attempt to delete a sublocation, a message lists the number of copies associated with that sublocation and lets you reassign those copies to a new sublocation.
- Click Update. A message warns that this process cannot be reversed.
- To proceed, click Yes. A new job is submitted in Job Manager
- Click View to see the copies affected by the change.